Volume 7 Number 1
©The Author(s) 2005
The Lunch Project
Abstract
This article discusses a project about lunch undertaken by a class of 3- to 5-year-old children in a preschool in Iowa. Following a description of the school and the goals of the project, the article presents the three phases of the project. The teacher's reflections about the project are also included. Photographs taken to document the project are included throughout the article.
Background Information
Dunlap Exemplary Preschool is a collaborative effort of United Way and the Des Moines Public Schools. United Way provides the funding and Des Moines Public Schools oversees the daily operations of the school. Seventeen children between the ages of 3 and 5 years old come to the preschool Monday through Thursday from 8:15 a.m. to 3:15 p.m. Eight of the children involved in this project speak English as their second language. The staff is made up of a lead teacher, Josie Floerchinger, and a teacher assistant, Noemi Mendez. The Lunch Project took place from February through March 2004.
Learning Goals for the Project
As I began the initial plans for the Lunch Project, I had several goals in mind for the children:
- To ensure that each child in our classroom had an opportunity to participate in the project in some aspect based on his or her interest level.
- To help children develop the skill of formulating a question in order to gain more information.
- To provide opportunities for groups of children to work together toward a common goal.
- To help children develop the organizational skill of planning before carrying out a construction or dramatization.
- To help children perform tasks with inventiveness and flexibility.
- To help children describe some people's jobs and what is required to perform them.
- To help children understand that things do not just happen, or magically appear, but occur because of a process involving a sequence of events.
Phase 1: How the Project Began—Food Truck Construction
We had been learning about the different ways to have a healthy body by discussing healthy foods and the basic food groups. I had brought in yellow, red, green, orange, and brown play dough so the children could make models of healthy foods. We started looking at our lunch menu each day, and groups of children would begin making the different types of food that would be served for our lunch. Soon we were using baking pans and Styrofoam trays so that they could role-play making and eating lunch. After several days of play, I asked the children, "Who do you think makes our lunch?" Many children were not sure, but several were convinced that Noemi, the teacher assistant, made the lunch because she wheeled in the food carts each day. We gathered in our circle and began to share ideas about what we knew about lunch. We created our first topic web (Fig. 1).

Figure 1. In February, we created our first topic web.
I realized from the children's discussion that they didn't have much background knowledge about the process of making our lunch. I did know that lunch was a very important part of our day. The children especially enjoyed the duty of being assigned to be the food helper, where they helped Noemi set the table and prepare the lunch for the rest of the class. I was beginning to think lunch would be a good topic to explore for a project.
One of our first discoveries was that our food for lunch was brought in a truck. We went outside to watch the truck driver unload our food carts. The children were awed. In unison they asked, "Where did you get our food?" The driver explained how our food was made in the kitchen at Brody Middle School and explained that the people at the middle school loaded the food into the brown food carts. The food cart was then put on the truck, and he delivered it to our school.
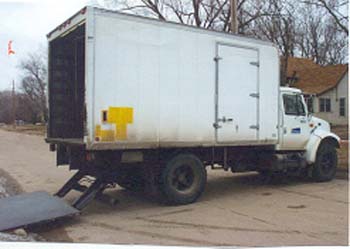
Figure 2. The lunch truck arrives.
The children were amazed to see how the driver used a lift on the back of the truck to help him move the food carts up and down into the truck. We watched as he pushed the different buttons to make the lift go up and down. We began to ask him questions about the buttons. He explained that he had a set of buttons on the inside of the truck and the outside of the truck. One child asked where he was taking the other food carts. He explained that he was delivering food to other schools, too.
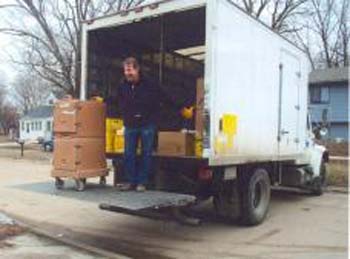
Figure 3. The truck driver pushed buttons to control the lift.
Once I saw the children's surprised faces and how they asked question after question about the truck and about where our lunch came from, I knew this would definitely be a topic of interest to them. I began my preliminary planning of what goals I would like for the children to achieve (see above). I knew that they would probably want to make their own lunch truck, so I began gathering boxes and other materials for construction.
The next day we went outside again to meet the food truck so we could take pictures. The children asked more questions about the buttons and the lift. They asked why the driver put straps around the food carts. He explained that he used the straps to stop the carts from rolling around inside the back of the truck.
A small group of children decided that they would like to make their own food truck. They began looking at the photographs that we had taken of the truck. They were very involved in sketching the food truck with all of the details.
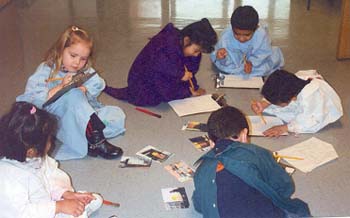
Figure 4. One group of children sketched the food truck from photographs.
Through their drawings, the children discovered that there were two parts to the truck: the back box where the food carts were stored and the front where the driver drove the truck. We looked at the pictures and counted how many wheels the truck had. We found out that there were four wheels in the back and two wheels in the front of the truck.
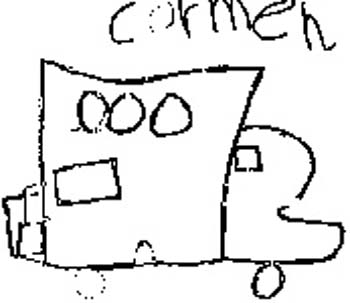
Figure 5. Carmen's sketch of the truck. 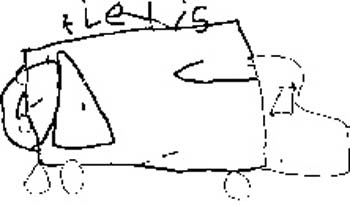
Figure 6. Alexis's sketch of the truck. 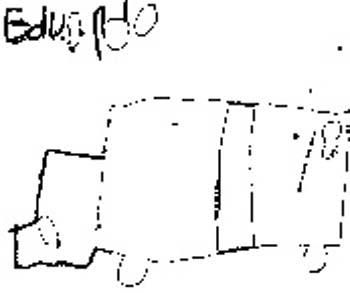
Figure 7. Eduardo's sketch of the truck. 
Figure 8. David's sketch of the truck. 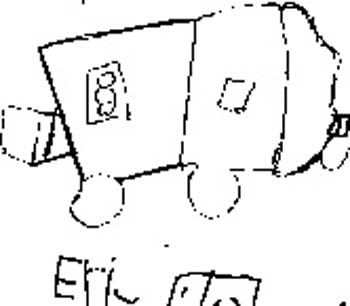
Figure 9. Eric's sketch of the truck.
I was amazed with how much detail the children included in the sketches. The children had explained to me the two parts of the truck, which were very evident in their drawings. I could see that the buttons and lift were going to be important to these children as we created the truck.
After the children had finished their sketches, we discussed what they thought we would need to build the truck. The children dictated a list of things that we would need, which included a refrigerator box, white paint, black paint for the wheels, paintbrushes, and paint shirts. Everyone went to gather the materials, and they began their work of constructing the back of the truck.
Teaching children the skill of planning and organizing before beginning a construction will be so beneficial to them as a life skill. I could tell that several of the children who had worked on projects before knew exactly how to plan and think of the materials that we would need.
After determining what supplies they would need, Angelica, José, Lindsey, David, Justin, and Erica began painting the refrigerator box white. Each child decided what area he or she would paint. At first, David said, "This box is going to be too big to paint." The group soon realized that by having everyone paint together it wouldn't take long at all. When they finished, they were very proud of their accomplishment.
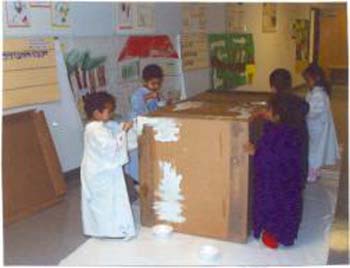
Figure 10. The children started painting the back of their truck. 
Figure 11. The children finished painting the back of the truck.
The next day, José, Justin, and Shantel began to work on a way to make a lift that would move up and down. At first, we thought string or yarn might work to make the lift move. Then José had an idea to twist pipe cleaners together in a long line like a cable. He and Justin tested the pipe cleaners to make sure that they would stay together.
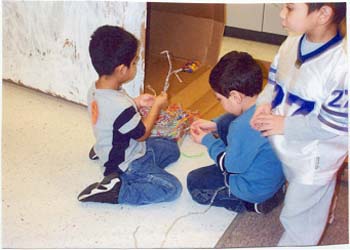
Figure 12a. José and Justin twisted pipe cleaners to make a cable for the lift. 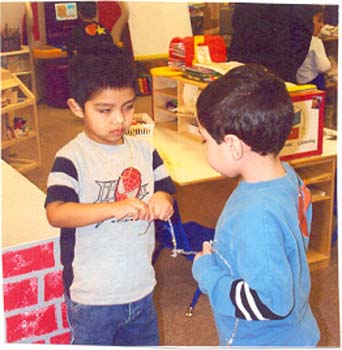
Figure 12b. José and Justin pulled on pipe cleaners.
One of the most exciting parts of the project for me as the teacher was the day the children decided to build the lift. I had put out some yarn and string, thinking that they would come up with an idea of using these materials to make the lift go up and down. José had a different idea and began experimenting with the pipe cleaners. Justin joined him, and together they made the lift cable longer and began to pull on it to make sure it was sturdy. I felt like I was watching building engineers. When the cable was attached and José could see that his idea had worked, he beamed with pride. I said, "José, you are such a problem solver." He went over to Noemi and announced, "Noemi, I am an expert. I am a problem solver!" I realized how powerful children's thinking really is if we just provide the opportunities.
José and Shantel then attached these pipe cleaners to the side of the truck and the end of the lift. The pipe cleaners made the lift go up and down. They decided to attach a pipe cleaner in the middle of the lift, which made a latch so that it would stay up when they weren't using it.
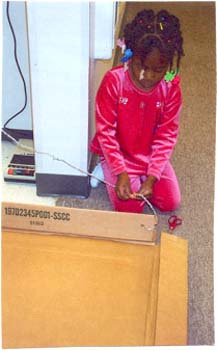
Figure 13. Shantel attached the lift to the truck.
José was very excited when we put the lift together because he could see that his idea had worked. He was truly an expert! José and Felipe decided to paint the lift gray, just like the real truck.
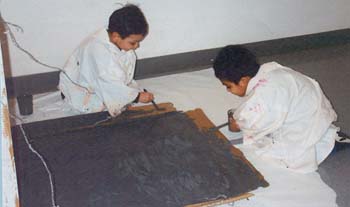
Figure 14. José and Felipe painted the lift.
The truck driver had explained to us that the red lights in the back of the truck were called markers. He explained that the lights were needed so that people could see the truck, especially at night. Lindsey worked to make markers for the back of our truck. She looked through the art materials and tried several different items before deciding that fun noodles worked the best.
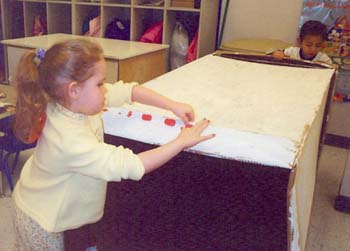
Figure 15. Lindsey put "markers" on the truck.
Donna volunteered to paint the buttons on the outside of the truck. She studied the photograph. She then decided to use yellow paint to make a rectangle. She found some film caps in the art center to use for the buttons.
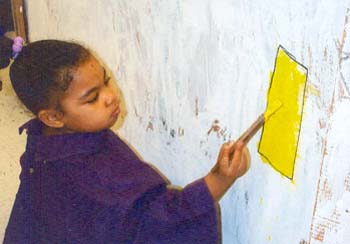
Figure 16a. Donna painted the button box. 
Figure 16b. Donna demonstrated the button box.
David volunteered to make the buttons for the inside of the truck. He studied the photograph, found a box, and painted it orange. He decided he would use Donna's idea and glued film caps on for buttons. We found an old phone cord to use, just like the real truck. With teacher guidance, David decided to put Velcro inside the truck and on the box so the box would stay attached to the truck.
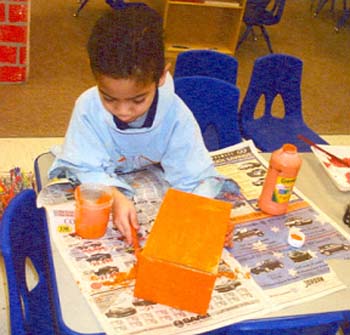
Figure 17a. David painted the button box. 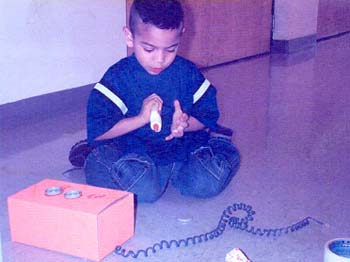
Figure 17b. David made the button box.
The next decision we had to make was how to construct the cab of the truck. We decided that another big box would be needed. A large box was found, and the children decided to paint it white just like the real food truck. Heather painted the sides of the box, while Shantel painted the top of the box. She explained that she had long arms and could reach across.
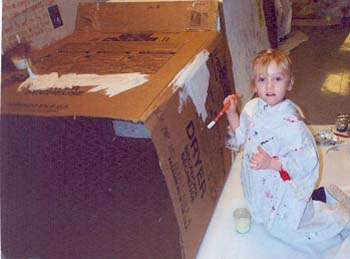
Figure 18. Heather painted the side of the cab. 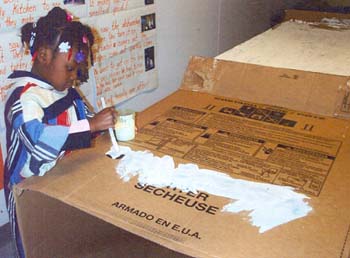
Figure 19. Shantel painted the top of the cab.
The children began to focus on the details of the cab. They decided that Josie should cut the door. They also wanted to make sure that there was a window in the door just like the real truck. Natalia volunteered to paint the wheels on the cab.
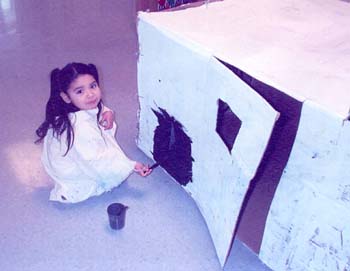
Figure 20. Natalia painted the wheels on the truck.
Heather and José studied the front of the truck and asked me, "What does that sign say?" I explained that it was the logo for the Des Moines Public Schools so people would know whom the truck belonged to. They each took turns writing some of the letters so everyone would know that our truck belonged to the Des Moines Public Schools.
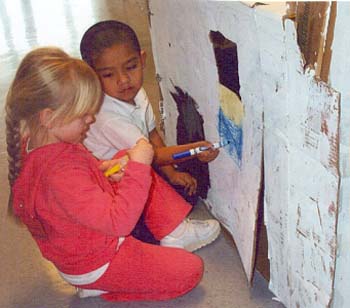
Figure 21. Heather and José wrote the Des Moines Public Schools logo.
I am always excited when children ask me what something says because that is my clue that they are becoming more and more aware of print. I have found that there are many instances throughout a project where children have the opportunity to learn about the many functions of print.
After the outside of the cab was completed, a group of children greeted the truck driver again one morning. We asked the truck driver whether we could look at his dashboard. We took some pictures. Shantel, Natalia, and José examined the photographs and began construction of their own dashboard. They used black construction paper and white crayons to make the different gauges. They asked about the functions of these different gauges. They were able to learn about opposites by finding out about the gas tank showing empty and full and the engine temperature showing hot and cold. They also learned the importance of numbers in knowing how fast you are going.
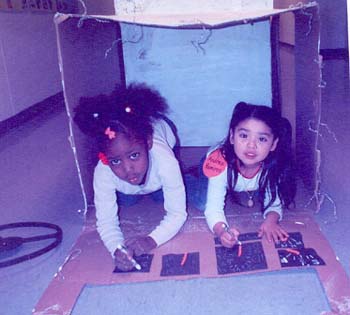
Figure 22. Shantel and Natalia worked on the dashboard. 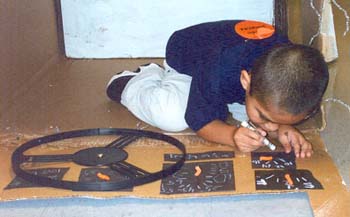
Figure 23. José worked on the dashboard.
One of the values of project work is that it gives children an opportunity to work together and feel like a community of learners. Shantel was a new member of our class. She volunteered to work on all aspects of the project. I feel this was her way of becoming comfortable and feeling like a true member of our classroom.
After the food truck was finished, it became part of our role-play in re-creating lunch. We decided that we needed to find more information about how our lunch was actually prepared. This part of the project—gathering information and representing our learning about the food kitchen—began the second phase of the project.
Phase 2: Investigation and Representation
After making our food truck, we decided that we needed to know more about where our lunch came from and who made it. We planned a field site visit to the Brody Middle School food kitchen. Before we visited the kitchen, we decided which questions we would ask so we could learn more about the kitchen. The children came up with the following questions:
- What buttons do you push on the truck?
- How do the wheels turn and move on the truck?
- How many people make our lunch?
- How do you know how much food to give us?
- How do you make chips?
- Where do you get the milk?
- Do you have machines that help make our food?
- Do you have pots?
- How do you cook our food?
- How do you make bread?
- Do you wash the dishes?
- Do you clean our plates?
- Who puts the food in the brown carts?
- Who puts the food on the truck?
I wrote the questions on individual sheets with a picture symbol to help the children remember what they wanted to ask. These were put on clipboards for us to take to the field site visit.
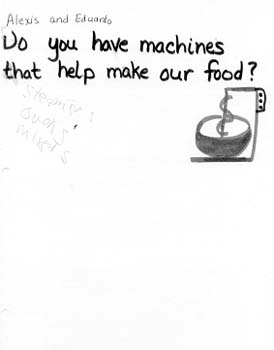
Figure 24. Each question was accompanied by a picture symbol.
Learning to ask questions to gain more information is a complicated learning skill that requires lots of practice and experience for preschool-age children. Most of the time, preschool children revert back to making statements about what they already know about a topic rather than trying to think of something to find out. I have found that the more experiences children have had working on projects, the more specific their questions become. I had noticed a significant improvement in the way the children asked questions for this field site visit compared to our pond and zoo field site experiences from earlier in the year. These questions were more on topic and clearly were being asked to gain more information.
Next, in preparation for our visit, we made a list of materials that we wanted to take with us. The children had gone on three other site visits earlier in the year so they were very experienced with knowing what materials we should take with us. Their list included a backpack, cell phone, emergency phone numbers, first aid kit, clipboards, questions, pencils and markers, camera, film, and video camera. On the day of the field site visit, we made sure to check off everything we brought along on our trip. This way, the children were able to see how a list helps us remember things.
With clipboards in hand, we arrived at the Brody Middle School food kitchen ready to investigate by getting answers to our questions.
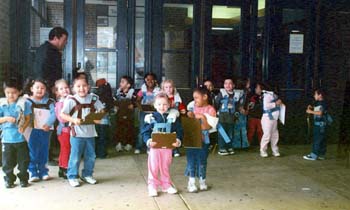
Figure 25. The children arrived at Brody Middle School to visit the kitchen.
Once inside the kitchen, we met Mary and the other people who made our lunch every day. Mary showed us the equipment that they used to make our lunch. She showed us a big cooking pot and the big dishwashing machine that washed our trays. The children were fascinated with how this machine worked. The children continued to ask questions about everyone's jobs in the food kitchen.
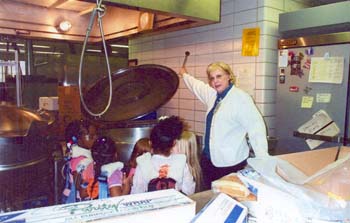
Figure 26. Mary showed the children a big cooking pot. 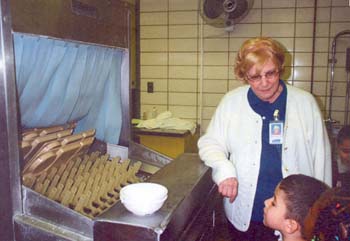
Figure 27. Mary also showed the children the dishwasher.
The first thing we did when we came back to school was to write a thank-you letter to the food kitchen staff for being so nice in answering our questions. We also wanted them to know that we appreciated all the hard work that they did to make our lunch each day. Next, we used the photos and information from a video that we took at the kitchen to create several books about the food kitchen. We decided to take everyone's answers to their questions and create an information book about the food kitchen. Each child drew a picture and either copied the words or dictated their answers to the teachers.
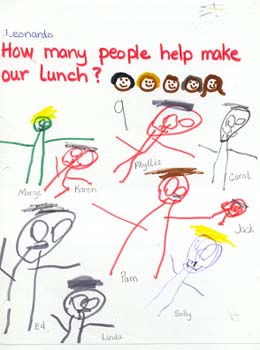
Figure 28. Each child helped create a book page about the kitchen.
A small group of children also decided to make a special book about all the people who helped make our lunch. We looked at the photographs of all the people doing their jobs. The children dictated what they wanted to say, and we typed it on the computer. This became a very special book in our library. We would look at the photographs each day when we wanted to know who made our bread or who fixed our vegetables.
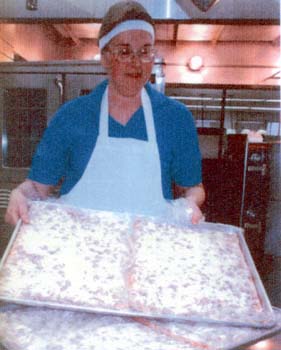
Figure 29. A photograph of a cook making our pizza was included in a book about the kitchen.
I was very excited to see how much interest the children took in this book about the people who made our lunch each day. Making this book was a valuable way for them to understand people's jobs and what is needed to perform them. It wasn't a one-shot deal but was something that was discussed throughout the rest of the school year. They would make comments almost everyday about how Liz made our pizza or Sam made our vegetables.
Another group of children took the various photos from our field site visit and created a story in sequence about all the equipment we saw and the people we met. This book also became very popular in our library.
I feel that one of the values of going on a field site visit is the opportunity for many literacy-related activities. The children were exposed to making a list, writing down questions, answering questions, looking at all the various signs and instructions found on the equipment in the kitchen, writing a thank-you letter, and creating information books. These activities were all a natural outgrowth of our project.
After visiting the food kitchen, our role-playing became much more involved and detailed. The children began wearing visors and aprons as they played. The children started to assign roles of who would make what food, just as they had seen at the food kitchen. Patty pretended to be Liz the cook. Juan pretended to be Sam who used the steamer. Carey pretended to be Sara the salad maker. They realized that we did not have equipment like the equipment at the real food kitchen. We decided to make a food cart, oven, and steamer.
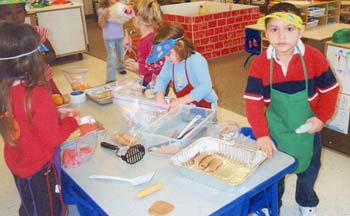
Figure 30. After the field visit, the children's role-playing became more detailed.
One unexpected result of our visiting the Brody kitchen was that the children learned that men also work in kitchens to prepare food. When we went back to school, I noticed a change in the dramatization that was taking place in our play kitchen. Before our visit, the boys mostly wanted to drive the truck and pretend to deliver the food. After our visit to the kitchen, many of the boys became involved in creating the food kitchen and preparing the food. They wanted us to call them Sam like the man we had met. Seeing a man making food for our lunch had a big impact on these children and taught them to make a change in gender roles during dramatic play.
Angelica and Natalia decided to make the food cart. First, they looked at the photographs and decided what materials they would need to make the food cart. Angelica suggested that we tape two boxes together. Noemi asked them what details they needed. They decided that they needed to make the handles and steamer plugs.
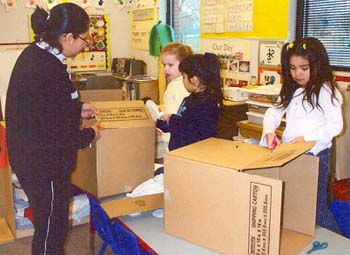
Figure 31. Angelica and Natalia made food carts.
Lindsey became involved with the project and suggested that they use pipe cleaners for the handles and latches for the doors.
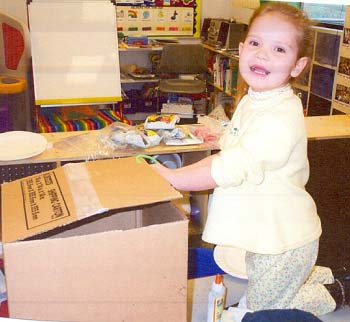
Figure 32. Lindsey made handles and latches for a food cart.
The next day Justin volunteered to help put wheels on the cart to make it move. We had some extra wheels from one of our toy shelves that we decided to use.
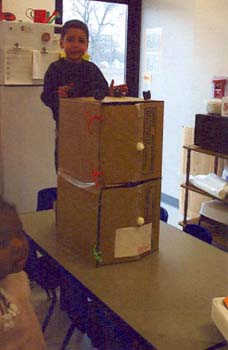
Figure 33. Justin attached wheels to a food cart.
We were ready to use our food cart. Juan started loading the lunch food inside right away. Now we could take it to the food truck to deliver to our preschool.
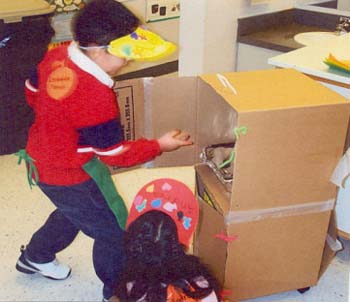
Figure 34. Juan loaded food into the food cart.
Cassidy volunteered to help make the steamer. She looked at the photographs and told Noemi that she would need three boxes. She decided to cut doors in each of the boxes to look like the front doors of the steamers.

Figure 35. Cassidy cut doors for the steamer.
Cassidy had the idea to tape or glue the three boxes together so that they would look like the real steamer. She decided that tape would work best. She began taping the boxes together. Natalia began to help her with the taping.
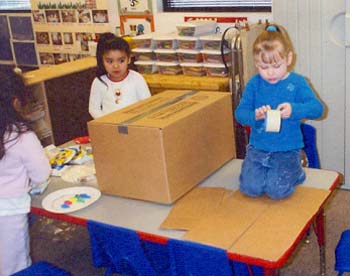
Figure 36. Cassidy and Natalia taped boxes to make a steamer.
The next day we looked at the photograph again. We noticed that the real steamer was gray. Patty and Erica decided to paint the steamer for us. We learned to make gray paint by mixing white and black paint.
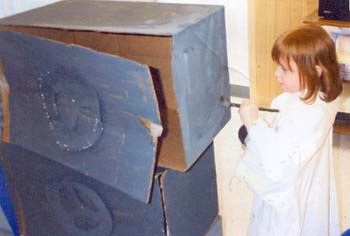
Figure 37. Patty painted the steamer gray.
Lindsey noticed that we didn't have handles like the real steamer. She took paper plates and cut holes in them to look like handles. She painted them gray. We decided to attach the handles to the steamer using brads so the wheel handles would actually be able to move.
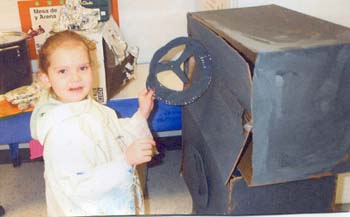
Figure 38. Lindsey attached handles on the steamer.
Justin was excited to pretend to be Sam from the real food kitchen. He decided that he needed to steam the vegetables for the school lunch.
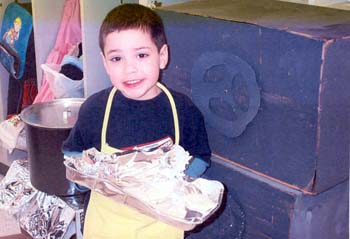
Figure 39. Justin used the steamer to cook vegetables.
As the children started to play food kitchen, they realized they didn't have an oven. Carey and Shantel looked at the photographs of the oven and decided that they would make the oven for our kitchen. Carey found a medium-sized box and explained that she was going to wrap it in aluminum foil so it would look shiny like the real oven. She and Shantel wrapped the box with foil and then taped it.
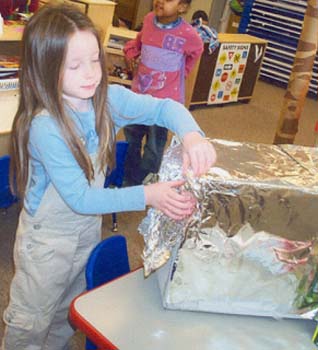
Figure 40. Carey helped make the oven.
We started to use the oven right away. Juan baked some burritos for our school lunch. He made sure to use the hot pads so he wouldn't burn his hands.
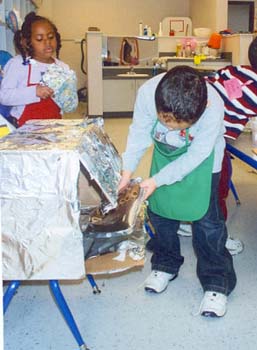
Figure 41. Juan used the oven.
Throughout the project, I watched the children use a variety of materials in our classroom. They were using these materials in order to create something meaningful to them. They demonstrated care when using the scissors. They had learned to use the tape dispenser by pulling off small pieces at a time. Each group that created a construction was always very helpful when it was time to clean up and put the materials back where they belonged. This was definitely a demonstration of a caring and respectful learning community.
Once the food had been prepared and delivered to the pretend preschool, the children began cleaning up the kitchen and decided that they would need a dishwasher to wash all the dishes from the preschool. Carey, Erica, and Juan looked at the photographs we had taken of the dishwasher.
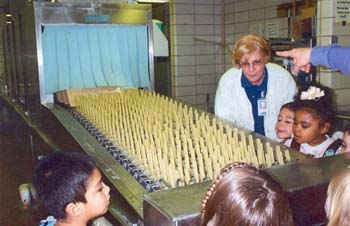
Figure 42. The children checked the photograph of the real dishwasher.
Carey had an idea of using some kind of paper to make the flaps in the front of the dishwasher. She went to the art center and found crepe paper. She found the color of blue that matched the real dishwasher. She began measuring the length of the paper to fit the box that we were going to use. She knew that she would need scissors and tape to attach the paper. Juan helped hold the paper while Carey cut it.
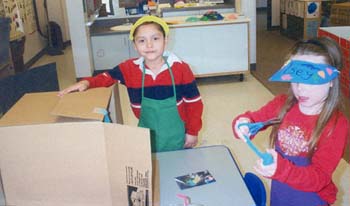
Figure 43. Carey and Juan cut flaps for the dishwasher.
Carey and Juan worked together to get the job done. Juan taped the paper streamers onto the box just like on the real dishwasher.
Figure 44. Juan taped flaps for the dishwasher.
Erica studied the photographs of the rack part of the dishwasher. She began bending pipe cleaners. Noemi showed Erica some plastic rods, which Erica began attaching to the pipe cleaners. Erica attached the bottom part of the pipe cleaner to the box using tape.
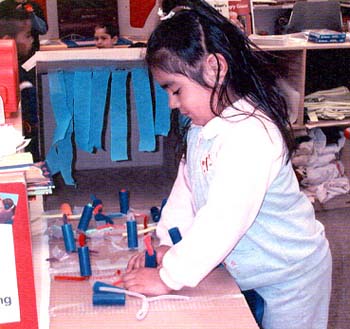
Figure 45. Erica made a dishwasher rack.
After they had finished making the dishwasher, Carey, Juan, and Erica tested it by putting the dishes on the rack. It worked perfectly!
Figure 46. Carey, Juan, and Erica tried out the dishwasher.
Now we had a full-fledged food kitchen just like the one we had visited at Brody Middle School. The children were very involved in role-playing the entire sequence of how our lunch is made. This dramatization went on for over three weeks.
Phase 3: Concluding the Project
Dunlap Food Kitchen Movie
After we made the food truck and all the equipment for the lunch kitchen, the children would pretend to make lunch for the preschool. Some of the children would pretend to work in the kitchen and make the lunch. Some of the children would pretend to drive the truck and deliver the lunch to the preschool. Other groups of children would pretend to play preschool. They would dish out the food onto the trays and pretend to eat lunch. We had the various books that we had made that we could share with our families about what we had learned about the food kitchen. We discussed putting on a show, but we had already put on a show when we did our pond project. I suggested that I could videotape them making our lunch just like we did when we went on our field site visit. The children loved the idea, and so we began planning for our movie. First, we decided who would play each role in the movie. Then we decided what we should have on the menu for the day. After the movie was filmed, I made multiple copies. We took turns sending the movie home with each child so his or her family could enjoy watching the class role-play the making of our lunch.
We decided on the menu for the food kitchen. David was in charge of using the oven to make chicken nuggets.

Figure 47. David made chicken nuggets.
Shantel made the bread rolls, and Heather made the applesauce.
Figure 48. Shantel and Heather made food for the movie.
Justin got the chicken nuggets out of the oven.
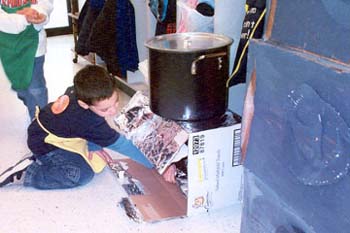
Figure 49. Justin removed chicken nuggets from the oven.
Natalia counted out the milk containers to deliver to the preschool. She had to count to 19.
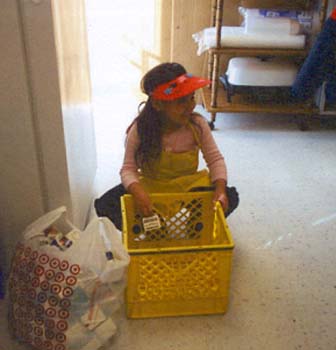
Figure 50. Natalia counted the milk containers.
All the food was loaded into the food carts. Then Juan put the food cart onto the truck.
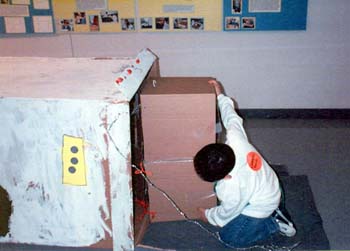
Figure 51. Juan loaded the truck.
José and Juan drove the truck and delivered the lunch to the preschool.
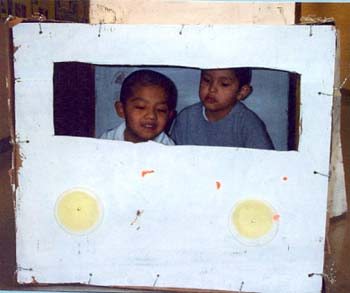
Figure 52. José and Juan drove the delivery truck.
Meanwhile, at the preschool, Lindsey pretended to be Noemi. She had to write down how many children would be eating lunch. Then she had to call the food kitchen and let them know how much food to make.
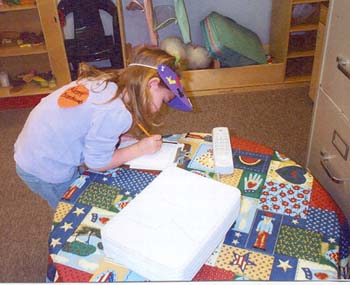
Figure 53. Lindsey wrote down the lunch count.
When the food truck delivered the food to the preschool, Lindsey and Gloria dished out the food onto the trays.
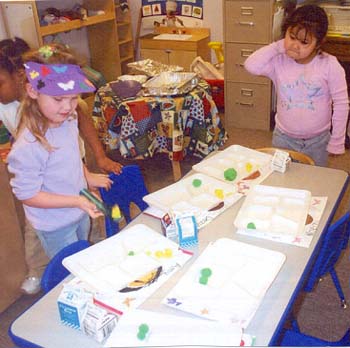
Figure 54. Lindsey and Gloria served the food.
After the food was put on the table, the preschoolers washed their hands. Then they sat down and ate a delicious lunch together.
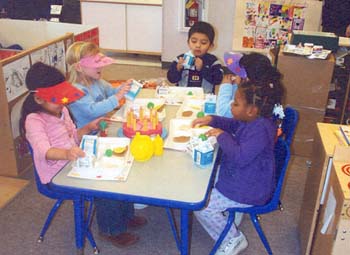
Figure 55. The children role-played eating lunch.
We also ended our project about our lunch by reflecting on what we had learned. I asked the children once again what they knew about lunch. We made a new topic web and compared it with our first web about "Our Lunch." They could see for themselves that they were now experts on lunch! We put both the webs up in the hallway so that their parents and other community members could see how much we had grown in our learning.
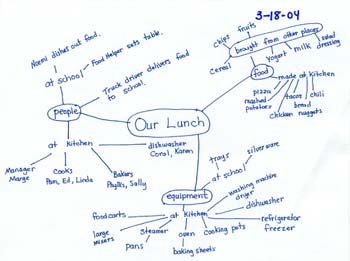
Figure 56. The class made a final topic web about lunch.
After we had created all the equipment for the lunch kitchen, the children began to develop an elaborate role-play of the entire process of how our lunch was made and delivered to the preschool. Almost every child in the class was involved in some way and would spend almost the entire hour of choice time dramatizing the lunch kitchen. During this dramatization, I was able to determine the different levels of knowledge that the children had acquired from this project experience. I could see they had a solid understanding of the process that takes place in order to produce a lunch for our preschool. I was able to see firsthand their understanding of the different jobs and what was necessary to perform them in order to make our lunch. I noticed an increase in the children's vocabulary as they used such words as "lift" in reference to the truck or steaming the vegetables. The children practiced their problem-solving skills as they negotiated who would play the roles, such as being the truck driver or Noemi for the day.
I realize the importance of play in the life of preschoolers and the value of giving them enough time to establish an elaborate play structure. Through this type of play, the children are able to solidify their understanding of the experiences that have been part of the project. Children need these opportunities to go over and over a scenario in order to make the connections between their newly gained knowledge and their previous learning experiences. They are developing elaborate structures of understanding in their minds based on the type of dramatic play involved in project learning.
Acknowledgments
I would like to thank all of the food and nutrition staff from Brody Middle School for helping us learn so much about our lunch. I would also like to thank Linda Anderson from the Des Moines Public Schools Food and Nutrition Department for helping us with this field site visit. I would especially like to express my gratitude to Noemi Mendez, our teacher associate, who has been so supportive of the children and me as we explore together during our various projects.
Author Information
Josie Floerchinger is a preschool teacher at Dunlap Exemplary Preschool in Des Moines, Iowa. She is a graduate of Iowa State University with a bachelor's degree in elementary education. She received an Early Childhood Endorsement from Drake University in Des Moines, Iowa. She previously taught for four years in first grade and four years in a multi-age classroom of 5- and 6-year-olds at Moulton Extended Learning Center, which is also part of the Des Moines Public Schools.
Josie Floerchinger
Preschool Teacher
Dunlap Exemplary Preschool
918 S.E. 11th
Des Moines, IA 50309
Email: floerchinger1@mchsi.com