Our Wheels Project: Finding the Extraordinary Within the Ordinary
A wheel is a circular component that is intended to rotate on an axial bearing. … Wheels, in conjunction with axles, allow heavy objects to be moved easily facilitating movement or transportation while supporting a load, or performing labor in machines. —Wikipedia
Background to the Project
The Wheels Project took place from January to March 2012 in a junior kindergarten/kindergarten classroom at the St. Nicholas location of Owl Child Care Services of Ontario in Waterloo. Owl Child Care Services, a nonprofit registered charity, operates seven centers in Kitchener, Waterloo, and Cambridge, Ontario. Owl is one of the largest center-based, licensed child care agencies in the Region of Waterloo, providing care for more than 800 children a day between the ages 3 months and 10 years old. Owl has served families in the region for more than 30 years.
In 2010, following a staff-led review of different learning philosophies, the organization decided that a change was necessary to remain current with evidenced-based practice in the field of early childhood education and care. The shift was made from theme-based to play-based learning with a focus on emergent curriculum based on Ontario’s framework for early childhood settings, Early Learning for Every Child Today (ELECT).
One classroom at each center was chosen to be part of the pilot project for the philosophy change, and our room was chosen at Owl-St. Nicholas. Four registered early childhood educators in the room—Denise, Grazyna, Angela, and I—were involved in this project. (A Conestoga College student and a volunteer participated occasionally.) This project was a vastly different way of providing learning activities to children for us; three of us had worked in theme-based child care for many years. It was new for the children, too, but they quickly adjusted to the changes that began in our room in May 2011.
During the pilot phase (May to August 2011), Denise, Grazyna, Angela, and I honed our observation skills as we began to identify the children’s play interests (e.g., shelters, water, farming). We learned how to create teaching webs based on what and how the children wanted to learn. We also made charts to remind ourselves what the children told us they knew and what they wanted to learn.
To further provoke the children’s interests, we put out resources (books, toys, pictures) to encourage discussion or asked them what they knew or wanted to know about a topic. We also created a variety of webs that reflected the children’s interests. Most of these interests would be pursued for two to eight weeks, during which the children led us to discover how important our observations were, how they knew more than we thought they did, and how they made use of the various resources we provided.
About 60 children were involved in the Wheels Project. The nursery school children attended two to five mornings or afternoons a week for two and a half hours each day; preschoolers attended two to five full days a week, and junior kindergarten/senior kindergarten children attended two to three alternate days each week. Many were beginning readers, which helped them when answering questions or thinking of their questions about wheels. We wondered if the differences in age and interests in our classroom would hinder our project or enhance it.
Our center is in a Catholic elementary school. Some of the kindergarten children attended an after-school program down the hall. This made the end of the day an important time for the project; children and staff could share what they had discovered about wheels with their friends who had been in school all day!
During this project, we learned a lot about giving children new materials and letting them try things they had never done before. Books, related materials, pictures, and documentation related to wheels began to fill our room and cubby area. We teachers also used the “Wings of Discovery” science curriculum as a source of ideas for related activities; the class had already done several activities about force from that curriculum.
Phase 1: The Project Begins
Introducing Loose Parts
Near the end of 2011, program staff began to discuss making our new project work part of the curriculum. We were encouraged to observe the children’s interests and to come up with ideas for a possible project such as those found on the Illinois Projects in Practice Web site. After reviewing some of the current projects on the Web site, we brainstormed and identified two ideas that we seriously considered because of the amount of interest in two types of “loose parts” in the classroom.
During the summer of 2011, I put some bungee cords and old toy shelf wheels into a basket in our room to see what might happen when we added these loose parts to our room (see Figure 1). Many times during the next few weeks, children included these wheels and cords in their play. Their play was usually safe, but some incidents with the cords made us wonder how safe those were. We persevered with reminders and redirection until finally they all seemed to understand. Parents also noticed the loose parts, and we reassured them that we closely monitored children when they played with them. We worked to create an environment where children knew the safety rules and could remind each other about them.
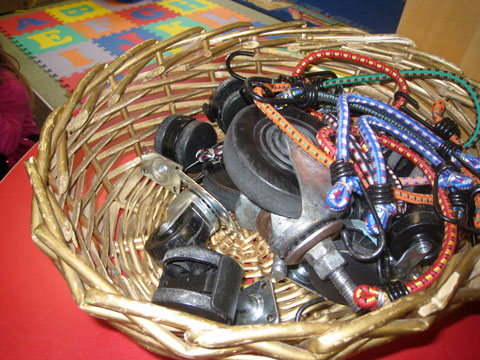 Figure 1. The first provocation was the basket of bungee cords and old toy shelf wheels.
As the children returned from their holiday break, we noticed that many were still playing with the old wheels. We then decided to make “wheels” the topic of our first project.
Focusing Event
The focusing event happened one day when we noticed the children wearing bungee cords around their waists, pretending to be workers, for the entire day. They used the cords to pull and move things as if they had wheels attached.I decided to attach wheels to the bottom of one of the many boxes in the room and let children pull it around by a cord. I used large paper fasteners and packing tape to attach four of the shelf wheels to a large box. The children were curious about what I was doing, and a crowd began to form. I gave them rides in the “boxcar,” which they said was lots of fun even though I went very slowly. I was afraid the wheels would break off, and, in fact, quite soon wheels began to come loose (see Figure 2). The children wondered why the wheels were breaking and why the box would not stay attached to the wheels. They tried to ride in the boxes without wheels, which they discovered was much harder. We could see their “wheels” turning: Wheels were important to making things work!
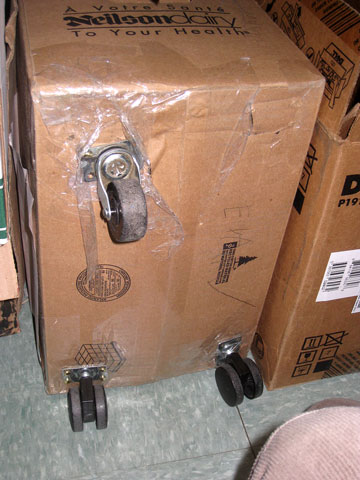 Figure 2. Broken wheels on the “box car” presented a challenge.
Books, the Internet, and Photographs
Denise went to the public library to find nonfiction books on wheels, gears, axles, and pulleys. The teachers also looked through book collections at home and at the center and placed selections on tables throughout the room. We posted pictures collected from our personal files and the Internet on the blackboard. One wintery day in January, I talked with a small group of kindergarteners and suggested taking the camera around the center looking for wheels they could photograph (see Figure 3).
 Figure 3. Children examined wheels found around the building.
Toy cars and trucks were easy to find, but the children and I also discovered that the toy pirate ship had a steering wheel and the iron had a wheel dial for setting the temperature. Then the children started to look for wheels that were not vehicle wheels. Janice, the cook, had a pizza cutter with a wheel. The children found a wheel on the can opener; they knew it opened cans but could not figure out how it worked. They noticed the computer mouse had a wheel, but they did not know what it did. I pointed out that the tape dispenser had a wheel; they saw it turn when we pulled a piece of tape off the roll. They were very involved in taking photos; we took about 75 pictures that day (see Figures 4–7).
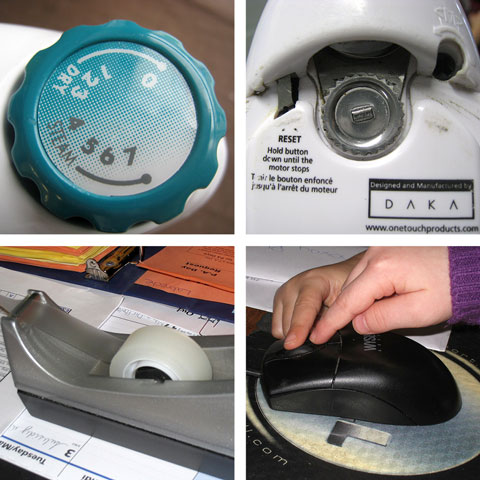 Figures 4–7. Children found wheels on the iron, can opener, tape dispenser, and computer mouse.
I made a teacher web to identify what we thought these children could learn about wheels. We thought they would be interested in what wheels do, jobs that wheels do, what materials wheels could be made of, why there are different sizes of wheels, the history of the wheel, and what different kinds of wheels feel and look like.
What They Knew and What They Wondered
The next day I printed and shared the pictures the children and I had taken. A large group of interested children joined me to talk about what they knew and didn’t know about wheels. We wrote what they said on sticky notes and posted them on the blackboard (Figure 8).
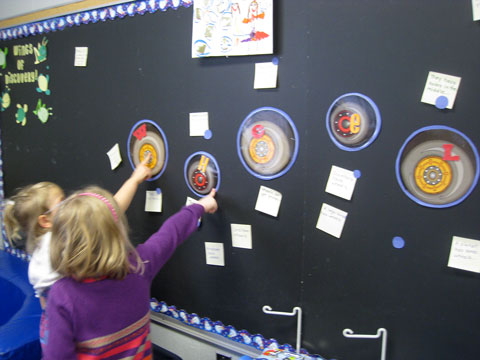 Figure 8. Children’s comments and questions were posted on the blackboard.
One child knew that cars have wheels. Another said that wheels can hurt you if they go over you. Someone wanted to know how to make a wheel and another child asked what wheels are made of. They noticed pictures of pulleys and gears and wanted to know what those were. One child noticed pictures of knobs and handles and did not think those were wheels; most of the children thought wheels were found only on vehicles.
The following two lists grew from the discussions:
What Do We Know About Wheels? |
What Do We Want to Know About Wheels? |
|---|---|
|
|
After identifying parts of our teacher web that we could cover with the children, we decided we could make this a project. Our goal would be to introduce the children to the “what, where, when, why, and how” of wheels and how this simple machine helps people do many important jobs faster and more easily.
We also realized that this project might go in an entirely different direction. The children might show interest in something we had not thought of, so we went into it with open minds and no firm expectations, which was quite easy because it was our first project. We hoped that there would be many “teachable moments.” This marked the end of Phase 1.
Phase 2: Investigations
Wheel Pictures From Home
We began Phase 2 by asking the children to bring in pictures of wheels that they could find in or around their homes. Kaitlyn (4 years, 5 months) brought in a page of pictures of wheels she and her sister found. I expected this to provoke discussion among the children about different kinds of wheels, and I laminated the page so it would survive more than one day. Many children noticed that Kaitlyn’s wheel pictures were of different sizes.
Grazyna found an experiment in the “Wings of Discovery” resources that involved marking a front wheel (along the outside tread) of three different sized vehicles we had in our room with white chalk. We marked a vinyl tablecloth with a masking tape starting line and the children rolled each vehicle until the front wheel had gone around once. Grazyna marked where each wheel finished. The children noticed right away that the biggest wheel made the longest line of chalk. Some children measured the lines with a ruler, and they discovered the large tractor wheel went the farthest (13 cm), the medium-sized wheel went 9 cm, and the smallest wheel went only 4 cm. Some of the children remembered the earlier force activities and recalled that bigger tires go farther than smaller tires when the same force is applied. When we asked which types of vehicles have big tires, the children mentioned construction vehicles, trucks, some race cars, and “monster trucks.” Scott (age 6) thought that larger vehicles use bigger tires because they need to do more work. He also thought larger vehicles went in mud more often and mud is hard to drive in, so that is why people use bigger tires on work machines.
Representations of Things With Wheels
Next, the teachers invited a group of children to paint pictures of “things with wheels.” Denise provided paper, a variety of brushes, a bowl of water, and watercolor paint. Karrie (age 4.2) designed a “modern car” with many wheels and a picture of herself in the driver’s seat. Angelica (age 4.4) painted a tricycle with lots of colors and different-shaped wheels. We displayed some of the paintings on the blackboard so the children could look at them.
The staff then discussed how the children might make three-dimensional representations. A few of the children had painted odd-shaped wheels on their vehicles, which provoked us ask them to make wheels using clay. Denise gave six children each a ball of clay. A couple of them had previous knowledge of how to form a wheel, but younger or less experienced children benefited from a demonstration of flattening the clay and rolling it into a circular shape. Some became frustrated because they wanted to copy their friend’s wheels but did not have the skills to do so. We recognized and acknowledged these feelings of frustration and reminded the children how important it is to keep calm and keep trying.
We put a few straws on the clay table, and soon Scott had poked a hole in the middle of his wheel with the straw. He said, “This is where the axle goes.” We set the clay wheels aside to dry. Denise also made triangular and cube-shaped wheels; as the days went on, children kept asking what they were for. When the clay was dry, we set out tempera paint and different-sized brushes. Some of the children who could read the names on the wheels called their friends to “come and paint yours.” There was excitement in the air!
The teachers invited children to experiment with putting a straw through a circle-shaped wheel, a triangle-shaped wheel, and a cube-shaped wheel and rolling them on the table. The children soon discovered that the triangular and squared wheels did not roll easily and there was a big bump as they went over the “points.” We laughed about how a car with square wheels would have a very bumpy drive. The children could see firsthand why wheels are shaped like circles. The reasons they identified were because the circle was not bumpy and needed less force to move. We asked them to draw with markers and pencil crayons to create imaginary vehicles with wheels in silly shapes to provoke more discussion about shape and size.
Late in January, we asked the children what types of materials they had found in wheels so far. A few of the children were becoming skilled at identifying the materials wheels were made of. As we looked at online pictures, books, and real objects, they identified materials such as rubber, soft plastic, hard plastic, wood, metal, painted metal, and even cheese! They found out that some wheels, gears, and cogs are made from two or more materials.
The Evolution of the Wagon
The wagon was a key part of the project because it provoked the children’s play interests. When I turned it upside down to show the wheels, some children were drawn to this strange sight. The teachers asked what they thought the wheels were made of. One child said “mostly plastic,” and another said “a little bit of metal.” We left the wagon upside down for the children to explore more closely.
They soon turned it into a stretcher for injured kids, which evolved into an ambulance to take patients to the hospital (Figure 9). Sydney (5.2), Kaitlyn, Claudia (age 4.6), and Catherine (age 4.2) dressed as doctors and nurses trying to make Valeria (age 5 years, 11 months) feel better. They transformed the carpet area into a hospital using wooden blocks and many boxes (20 or more boxes had recently taken up residence in the room). At one point, at least six patients were in the hospital with various injuries bandaged up with tensor bandages and fabric.
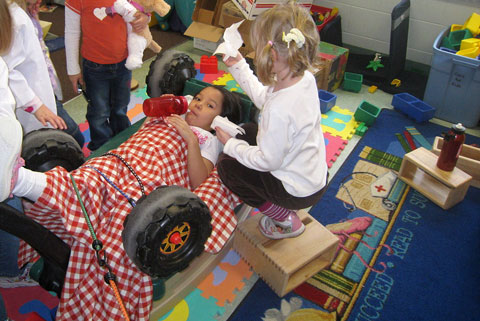 Figure 9. The wagon played a role in hospital play.
Such interactions around shared interests encouraged the children’s peer group entry skills and reinforced their helping skills. They practiced making friends, conflict resolution, and social-emotional problem-solving during the wagon/hospital play. After some time, the children asked to turn the wagon upright again. They then used it as a police car, a horse wagon, and an ambulance again. Discussion turned to how community helpers rely on wheels to do their jobs and help people. Many of the children had experience with community helpers, and this conversation was very long.
Active Play With Wheels
To introduce gross-motor activities, we brought square scooters in from the playground shed. The children were excited and proud to be able to use the scooters, which were primarily for the school-age children (Figure 10).
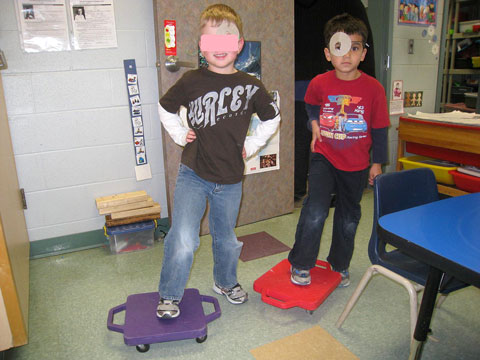 Figure 10. Philip (age 5.4) and Nathan (age 5.6) played doctors on wheels.
The children quickly determined that the scooter wheels were made mostly of plastic and metal. At first, we let children sit on the scooters and move them around the room with their arms and legs. Eventually they put boxes and toys on them and moved those items around. They then joined the scooters together with the bungee cords to make a train. When someone sat on the wooden dramatic play chair that was on top of a red scooter one day, I decided to make it safer and more secure by fastening the chair to the scooter using a bungee cord. This began the wheelchair experiment (Figure 11). The children found they could use the “wheelchairs” for many things. Sydney wanted to sit in one to eat lunch; the teachers let some children try that. It was interesting to hear how they thought the wheelchairs should be distributed because there were just five—not enough to go around. They thought the teachers should pick the best “tidy-uppers” to be first. The children soon took wheelchairs into the hospital play area, where the doctors and nurses used them to move patients.
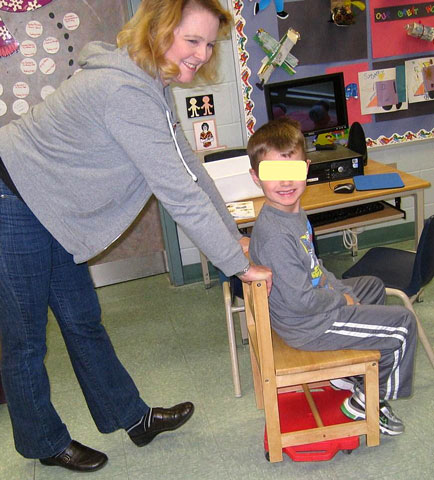 Figure 11. Kenneth (age 5.5) rode on the first “wheelchair.”
We had to insist on a new rule when we noticed two children had put bungee cords around their necks and were crawling on the floor to pull a “wheelchair,” pretending to be horses pulling wagons. We reminded them to “always, always, and forever” remember to not put anything around their necks and asked them to find other ways to attach themselves to the wheel toys. They decided to attach bungee cords around their waists and walked instead of crawling. The children were proud of their solution.
Learning About Axles
Grazyna facilitated an activity called “What is a car?” from the Wings of Discovery curriculum. In this activity, the children learned the parts of a car by making a model from a box, some straws, water bottle lids, and thin wood sticks. The children helped her label the main parts including the steering wheel, tires, wheels, and axles. When we asked if they thought every wheel had an axle (a center part around which to turn), most said they thought so. The question provoked investigation of all the wheels in our room. The first place many of them looked was the bicycle tire on the “interests table” (see Figure 12).
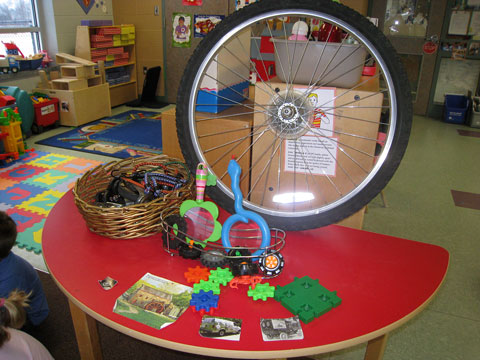 Figure 12. The interests table held a variety of wheels.
After much reflection, the children concluded that there is always a “poke-y part” in the center of a wheel that attaches it to an object.
Investigating Gears
The teachers helped the children take apart an old clock and investigate what was inside. They discovered some very small wheels, which we explained were called gears. We put the parts of the clock into a transparent container for the children to examine. Grazyna asked the children why we put them into a container. Kenneth said, “So we don’t lose them because they are small!” Grazyna and a small group of children looked through a library book about gears, which explained that gears are wheels with teeth or cogs that join with other gears.
We looked for other opportunities to expose the children to other objects with wheels/gears. One day Grazyna brought the “Rotato electronic peeler” from the kitchen while we were having apples and cheese for snack. She had noticed it had a rotating disc that could hold an apple in place and wondered if the children would notice the disc looked and acted like a wheel. She asked them to look at the peeler from different directions and stated safety rules such as “look only with your eyes” and “only use it with a grown up.” The children made a variety of comments. Someone noticed the apple was held on with spikes that dug into the fruit. They guessed that when the machine was plugged in and the apple turned, the blade would cut off the peel. Grazyna asked how they knew it could do that, and they said the blade was shiny and looked very sharp. We were impressed by their growing abilities to reflect on past learning experiences to reach conclusions like that. One child noticed that the Rotato box showed pictures of a pear and a potato, and right away the children were interested in using those foods on the machine. Finally, with some prompting the children identified the part of the machine that was a wheel as well as the axle that held it on the base.
Car Parts for the Playground
We asked Nathan’s father, who owned a garage, if he would donate some car parts, specifically tires, for the project. He brought in three different-sized tires, an old steering wheel, and a hubcap. The morning he put them on our playground, it was too cold to go outside, but many children looked out the window and asked about the tires. It was great to see their faces when we told them they could play with the tires outside later—yet another opportunity to explore materials that many of them had never played with before! However, we had not anticipated that dirt would come off the wheels onto children’s snowsuits, especially Catherine’s light pink one! Denise and I apologized to a few parents about that, but no one was too concerned.
Numeracy
The children had noticed that vehicles might have differing numbers of wheels, so we provided some opportunities for them to represent those differences. Some children grouped pictures of vehicles according to the number of wheels they had. It was helpful that we had many models and examples of the vehicles they identified, although we could not find anyone with a unicycle to bring in for our children to observe! They grouped vehicles with two wheels, three wheels, and four wheels, then organized our toy cars, trucks, planes, and trains into groups with the same number of wheels. They found that many trucks had six or more wheels; one child commented, “It would cost lots of money to buy all of those wheels.”
Children also helped tally how many cars their families had. We invited some senior kindergarten children to take a tally sheet around the classroom, asking classmates and teachers to print their names and put one sticker next to their names for each car their family had (Figure 13). They solved problems such as figuring out who had not signed the tally sheet and how to spell some classmates’ names. The teachers offered to help with printing, reading, and organizing the chart. Some children guessed how many cars there were altogether, and then counted 37 cars. Children enjoyed finding their names and showing their parents at pickup time.
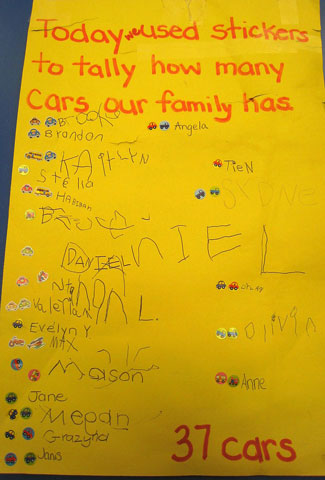 Figure 13. Children used stickers to tally the number of family cars in the class.
Documentation
Denise, Grazyna, and I had listed the types of wheels our class had identified, but we also wanted to create some large durable documentation for the children. We asked them to help us find pictures of different types of wheels. We covered the pictures in packing tape to make them more durable so children could take them off and stick them back on the chart paper. We posted the chart on the blackboard where the children could refer to it (Figure 14).
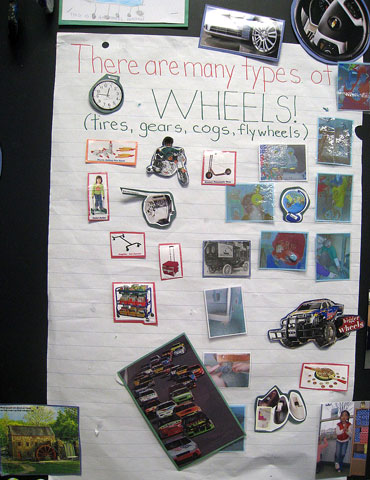 Figure 14. Children found pictures for a chart featuring different types of wheels.
Items on the chart included:
| Cars, trucks, bikes | Penny farthings | Strollers, shopping carts | Elevator pulley systems |
| Trains, scooters, planes | Pizza cutters | Lunch carts | Roller coaster gears |
| Clocks | Fishing reels | Tractors, lawnmowers | Crane pulleys |
| Rollers in a factory | Yo-yos, pinwheels | Spinning wheels | Anchor pulleys |
| Skateboards | Merry-go-rounds | Garden hose holders | Can openers |
| Roller skates | Spinning tops | Wishing wells | Sewing machines |
| Doorknobs | Wheelbarrows | Egg beaters | Flag pole pulleys |
| Garden faucets | Wagon wheels | Cheese wheels | Car engines |
| Windmills | Watermills | Walkie-talkies | Lawnmowers |
Interesting Props
I brought in an old agitator from a washing machine, turned it upside down, put a hard cardboard tube on the post, and topped it with a bicycle seat. The children took turns sitting on it while a teacher helped them balance so they could stay on the seat (Figure 15).
 Figure 15. A child sits on the bicycle seat on top of the washing machine agitator.
In February, I brought in my blue suede roller skates so the children could further explore the movement of wheels. I moved furniture, rolled up the carpet, and marked off an area for scooting and skating with masking tape on the floor. Rules for this activity were: wear one roller skate at a time (tied by a teacher), keep your other shoe on when wearing a roller skate, and go slowly at first until you feel sure of your balance. The children practiced many things: waiting their turn, putting on and taking off shoes, trying to stand up, balancing on wheels, pushing off the wall, controlling their speed, deciding which direction to go, and stopping. First, I allowed six children on scooter boards and two children wearing one skate apiece. They quickly learned to go slow with the roller skates to be safe, and I quickly learned that eight children in this arena were too many. I decided to allow four children on scooter boards and two on skates from then on (Figure 16). The children decided to add a cardboard gas pump so one more child could play, having the role of gassing up scooter boards.
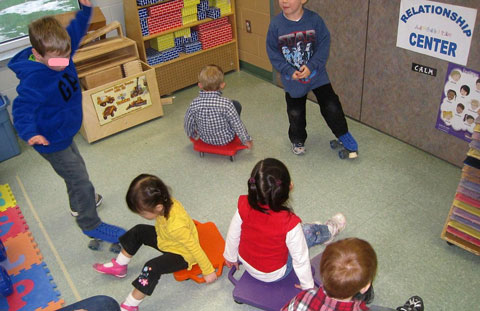 Figure 16. Children took turns with roller skates and scooter boards.
We allowed props into the arena once. Scott decided to attach two big pillows around his waist with a bungee cord. He said they would protect him if he fell down—and they did (Figure 17). Valeria tried lying across two scooter boards and “surfing” around the arena. She said two scooters were harder to move but were much more fun.
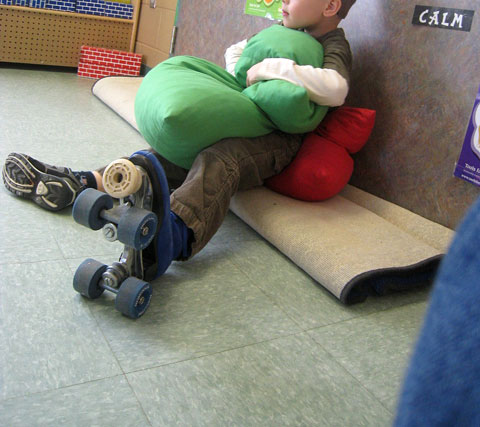 Figure 17. Scott protected himself with pillows and bungee cords.
Pretending and Reality
One day on the playground when the children were tobogganing down a small hill, Grazyna asked if they could use their bodies to roll down the hill like wheels. They immediately started rolling, leaving their toboggans. They had rolled on the hill quite a bit while we were building it to help pack down the snow. When asked to compare their rolling bodies to car wheels, one child responded, “We don’t have axles.” “That’s true,” said Grazyna, “We don’t. However, what if we pretended to be wheels on a car?” The children said “NO! Because it would hurt us to go on a road with a heavy car on us.” Their knowledge of how car wheels work enabled them to generalize that being a wheel would hurt a human body because a car weighs a lot. They enjoyed pretending, but knew they didn’t actually want to be wheels.
Investigating Cranes
After looking at the cranes in a library book, Scott decided he could make one. He asked for yarn and a basket to attach it to the classroom door (Figure 18). It was difficult to find a basket with handles that would not tip the load out onto the floor. We finally found one in a storage cupboard along with a toy crane with a windup handle. Scott decided to tie the string to the basket, then put the string up and over the door handle and down to his crane. It became a pulley system, and the door handle became the “wheel machine.”
 Figure 18. Scott’s first crane was very simple.
Later, Scott used a block toy to build a “base” for his crane. He put it on top of a toy shelf, and the basket hung down to the floor. As he turned the small winding handle on his crane base (Figure 19), he discovered that it could hardly lift the big basket. He thought this was because the basket was too far from the crane. When he wound the string up halfway and I held the basket halfway up the shelf, it was easier for him to raise the basket.
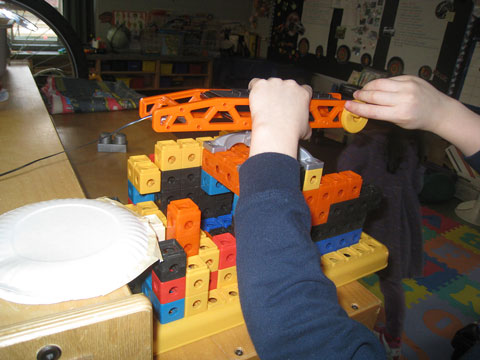 Figure 19. Scott built a base for his second crane.
The crane had another transformation when some of the boys were building a platform near the wall in the block center using the large wooden block bucket. Scott wondered if his pulley system, which now used a lighter basket, could work with the rope hanging over the window handle. He wanted to move the Fisher-Price little people to the top of the “mountain” and back in his basket, which he called a gondola (Figure 20). Many children watched him, and a spontaneous discussion followed. One girl said she would not go up in a gondola to the top of a mountain, starting a conversation about who would and would not ride a gondola—a reminder to children that different people may have different feelings about an activity.
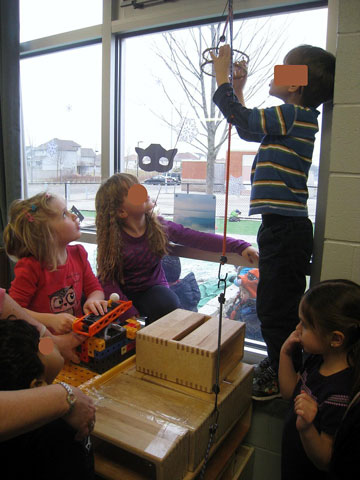 Figure 20. Sydney, Anita (age 5.5), and Isabel (age 4.5) watch Scott’s gondola work.
Another crane system involved a broomstick, string, a tool basket, and two wooden chairs. The two chairs supported the broomstick. Nathan attached the string to the broomstick and added a big popsicle stick to help turn the broomstick. Then he attached the tool basket to the other end of the string and wound the string by turning the broomstick (Figure 21).
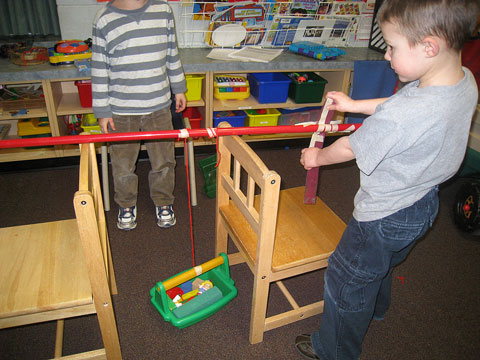 Figure 21. Nathan wound the broomstick to lift the tool box.
We teachers had considered asking the hardware store for wood and pulleys and asking Denise’s husband to build a standing pulley system for the classroom. We did not take these steps, but if we were to do another wheel project, I would try to include this type of prop. Letting children build working machines, even simple ones, encourages their resourcefulness.
Putting It All Together
We drew from another Wings of Discovery activity to have children explore how wheels turn or pivot to let a vehicle turn corners smoothly and safely. They could see that when a driver turns the steering wheel, it turns a cog that then turns the axle, which is attached to the wheel. Bicycles work the same way—turning the handlebars turns the post, which turns the axle to which the wheel is attached. The children and I made a pretend bicycle from some of our props: a bike wheel, big wooden blocks, a hubcap, and the agitator turned upside down with the bicycle seat mounted on the tube. They used the steering wheel Nathan’s father provided as the handlebars (Figure 22).
>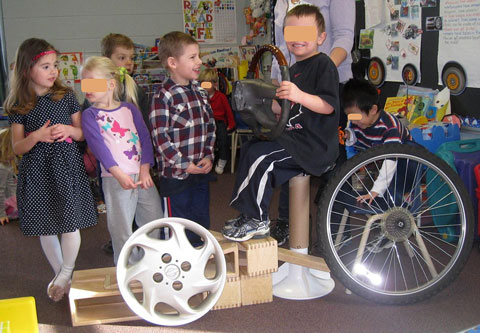 Figure 22. James (age 5.2) had the first “bicycle” ride.
Many children lined up beside the bike for a turn. I sat behind the riders so they would not fall backward. The children talked about where they were going and how long it would take to get there. “Infinity years” was one idea.
Wheels and Art
At one point, the teachers prepared a theme-based wheels activity many early childhood programs have done: We gave the children plates of paint and small toy vehicles so they could paint with wheels. Some children “drove” them from side to side on the paper like cars on a road. Others used the vehicles as paintbrushes. They noticed the different tread trails. Later, Grazyna showed the children how to color the wheels of the wagon and the tricycles with chalk, then observe the tread patterns as the chalk came off on the pavement.
Another art activity related to wheels involved a salad spinner. Angela pointed out to the children how the lid, the basket, and the spinning wheel inside the lid fit together. Children took turns putting teaspoons of red, blue, and yellow paint on small paper plates at the bottom of the basket. One child would hold the salad spinner while another turned the handle. They experimented with turning the handle slowly, quickly and “really, really fast!” We asked, “What happened to the paint?” Sydney said she thought “a force” made the paint spin toward the edge of the paper, kind of like when you ride on a “spinny ride.” People also noticed new colors on the paper, such as purple and orange (Figure 23), made when the colors mixed.
 Figure 23. Children noticed the blended colors.
Discussion of Wheels and Circles
Late in February, I was reading aloud from a picture book when a young child commented, “There is a wheel on that tree.” The child was referring to a round window in an illustration. We then had a teacher-led discussion in which it was decided that those were circle-shaped windows, not wheel-shaped. Multiage grouping helped with this; the senior kindergarteners explained to the younger children that wheels are circle-shaped; however, not every circle is a wheel. I asked children to search our room and find some circles that were not wheels. It was a challenge for many of them, but eventually they found round blocks, the round magnifying glass, a round plate, and crackers. They were thinking logically about differences between wheels and circles.
Tires in the Parking Lot
One day, Denise asked the children what types of things they could see outside that we could count. They noticed trees, cars, people, and signs, to name a few. She then asked how many cars they thought were in the school parking lot. We decided to tally them on a piece of paper on a clipboard while walking from one end of the lot to the other. We counted 48 cars. Denise then suggested making a chart to document how many wheels were in the parking lot that day. The children took turns guessing how many wheels there would be. Denise asked how many wheels a car usually has. Four was the popular answer, although a couple of older children had noticed a few vehicles with a round object on the back. Denise started a chart with the children on which they used black circles to represent tires, including the spare tires. They discovered that three vehicles had spare tires. When all the black circles were glued to the chart, we counted them with the children and found there were 195 wheels in the parking lot that day!
Phase 3: Concluding the Project
The teachers planned a March field trip to the Region of Waterloo International Airport, 20 minutes away. We had considered a trip to a construction site where there were cranes and big wheels to see, or a Canadian Tire Store where the children could look at the tires for sale. However, when the opportunity came up to go to the airport, we decided it might provoke a new interest for our children. As we planned the trip, we talked to the children about what they might see at the airport. Their list included big and small planes, people who drive planes and fix planes, wheels on the bottom of the planes, trucks that load suitcases on the planes, fire engines to put out fires from crashes, and runways where planes land. The children could see how wheels worked in a travel setting and get a very close view of airplanes, which interest most children. We decided it could be a perfect finishing point for our project.
One of the staff welcomed us to the airport and showed us up to the classroom area. We reminded the children to walk quietly and show respect for the class in progress, explaining that those people were learning to be pilots. An enthusiastic, engaging woman pilot explained the different types of planes, including gliders and twin-engine and single-engine planes. She had the children use their bodies to imagine they were planes (Figure 24).
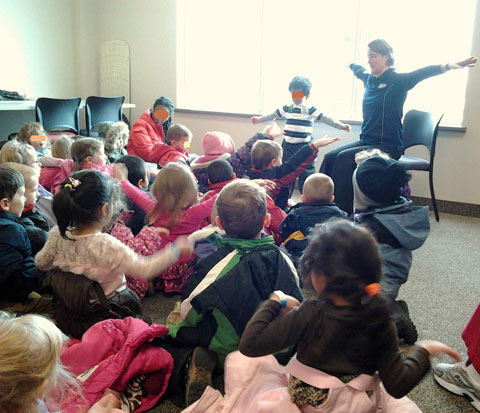 Figure 24.Children put their arms out to imitate planes.
The class then toured the hangar to see some of the small planes. The tour guide told the children to never walk or run under the airplane wings; a few children were told to go back and walk around the wings when they accidently walked under one of the wings of a plane. They learned it is dangerous because someone could bump their head or damage the wing.
In the hangar, the class saw small wheels on big planes. They also saw many tools and watched a man inspecting a plane for broken parts. The children were surprised at how small the planes’ wheels were compared with car wheels or bike tires. We talked about the materials the planes were made of, including the wheels, and they identified metal, rubber, and possibly plastic. The pilot thought there was plastic on the inside of the airplane. We looked for the axles and saw a metal handle used to pull the smaller planes.
We went outdoors and looked at planes on the tarmac. The children heard many new and interesting noises and saw planes taking off and landing, which they thought was extremely cool! The pilot asked if we would like to ride on our school bus down the tarmac to the fire station next door to see the fire engines. The bus driver got permission from the bus company, so the class boarded the bus on the tarmac and rode down the runway to the fire station. Some children wondered why the fire station was at the airport, but figured out that the fire engines are there in case of a fire at the airport. Firefighters showed the children their protective gear and the parts of the fire engine. They let the children sit in a fire engine, and we watched the fire truck spray water, just as it would to put out a fire. The children enjoyed watching the rainbow that the water and sunlight created.
The project was wrapping up just as we hoped it would. Like every wheel used in our project, it was moving forward and building on knowledge with each experience our children had. The teachers considered what might be the next project or the next play topic. Some possibilities were flight, water, or jobs people do.
Teacher Reflection
Writing the first version of this article, titled “Our Wheels Project,” helped me remember the details and order of the very first project I had ever been a part of. It was written initially so my co-workers and I could keep a compact version of all of the documentation we had written, as well as some of the pictures and the children’s artwork. We put the finished document into page protectors in a binder so parents and children could look at it and reflect on all of the “wheels” activities we had done. We displayed it during our Mother’s and Father’s Day socials. Because the Wheels Project was the first project done and documented by any of the Owl Child Care sites, the organization decided to link to it on Owl’s website.
It was amazing to see the children using new skills they had learned and practiced during the Wheels Project. I learned during this project not to be afraid to try anything new, because if you are, the children might miss out on a cool way to learn. Yes, they can also learn in other ways, but if you can experience a truly teachable moment, why wouldn’t you? Having teachable moments almost every day during this project was very fulfilling for me.
I was surprised by how easily the project activities flowed one after another. Activities related to “wheels” were exactly right for the children in the junior kindergarten/kindergarten room at that time. The project activities appealed to the diverse population of young children in the room—whatever their ages. Every child, no matter what their disposition, got involved when we provoked their interests in the right way. A project may become bigger than you think it will. Children are amazing!
This topic also was the right one for the teachers in the room. We learned along with the children. After almost 25 years in the field, I already trusted children to know what they wanted to learn, but I relearned how to trust them. Our children are “tech-y” —they know how things work, but they want to know more! They read at younger ages. They have humorous answers to teachers’ questions. It meant a lot to me to learn along with them. I didn’t realize what a variety of activities the project involved until I reflected on them to complete our documentation.
Each day we spent different amounts of time doing project work with the children. We didn’t limit or pressure ourselves to plan the project time. It was difficult to keep my enthusiasm for the Wheels Project under control and remember to keep up routines such as eating lunch! I enjoyed bringing in props for the children to try out—being surprising and providing experiences they may not have had before and opening their eyes to the possibilities. It was difficult for me to avoid making impulsive decisions about what the next activity would be. I had to keep in mind that my two co-workers also had ideas and opinions.
One of the things that I would do differently next time would be to take more pictures and keep a journal with more details, such as what each child said and did. Although we did not address all of the children’s original questions about wheels, I do not think it really matters in the end if those questions weren’t answered; their new questions were. It was even difficult to keep up with all of the things the children wanted to do during the project. We might never have had lunch on time if not for the five-minute warnings that lunchtime was almost here.
One child especially benefited from the wheels project. This child took most of the initiative to push the boundaries throughout the project and emerged from being a solitary child to a leader of group activities!
Providing inspiration to my co-workers is one of the main reasons I have written this article. I wanted to reflect on what was for me the most honest, easy way to teach children while learning right along with them.
Author Information
Jane Cowan is a registered early childhood educator (RECE). During the Wheels Project, she was working in the preschool room at the St. Nicholas location of Owl Child Care Services of Ontario. Jane has worked with children and families at Owl since 1986 and is currently a preschool teacher at the organization’s Saint John Paul II location.
Jane Cowan, RECE
Owl Child Care Services of Ontario
2-10 Washburn Drive
Kitchener, ON N2R 1S2 Canada